Ruby-throated hummingbirds are back on PEI, and the first one arrived in our yard on May 8. They are beloved summer residents, adding zip and zing to our summers and then heading south again the first or second week of September.
I have two feeders for them (three, really, as I have an extra one to replace one that is being cleaned). The sugar water they drink also attracts ants, who motor up and down the ropes the feeders hang from, many of the little souls drowning in the feeder wells. Hanging hummingbird feeder moats that hold water can be purchased to block ants from reaching the feeder.
Or you can make your own for free from some wire and an old spray can lid or something similar. There are a million tutorials online. Poke a hole in the lid, bend a wire hanger into a hook and push it through the hole, and seal and glue the hanger in place. I made some over 10 years ago and they are still saving ants from a sugar-high death.
Like many on PEI have already done, we are having a heat pump installed next week. My mother has a 900 square foot apartment at the end of our house, and we want the unit for the air conditioning feature in the summer. It’s something we’ve resisted, mostly because we’ve never needed air conditioning here in the past and it seemed like an environmentally-unfriendly extravagance, but the heat and humidity we experience regularly in the summer now takes its toll on her at age 101 and it’s time to give in.
I was hoping the installation would have been done earlier in the year, but backordered units and a busy installer (I have learned to beware the tradesperson who is quickly available!) delayed things, so I hauled out a portable air conditioning unit today to give my mother some comfort in this latest heat wave.
I bought the a/c unit a year ago when my mother started to feel unwell during another heat wave (there are so many now). In my haste to help her to feel better, I didn’t do much research before buying and then realised when I got the unit home that the crank-out casement windows we have were a problem as the insert to hook the exhaust hose to the window were made for hung or sliding windows only. There are lots of janky looking contraptions available online to solve this problem, but I needed some way to hook it up quickly.
My first attempt, a panicked corrugated-cardboard/dollar-store-duct-tape affair, collapsed in the middle of the night and allowed swarms of insects into her bathroom, so I searched for a better solution. I found a few hacks using a piece of plexiglass to fit the window opening and cutting a hole for the hose, but I know from experience that plexiglass can be tricky to cut, especially a circle, and it’s expensive to experiment on, so that was out.
Then I thought of corrugated plastic sheets, the same stuff that is used for signs and packaging. The closest place that had any in stock was Home Depot in Charlottetown, so I ordered for pickup two of the thickest pieces they had (two in case I screwed up the first one!) and some good quality duct tape. I bundled my mother into the car for the 200 km roundtrip to give her both an outing and the benefit of the a/c in the car, a nice salesperson brought the goods out to us, and we boomeranged home so I could hack away.
A/C hackorama 2023
I was surprised by how well my setup worked last summer. It isn’t a pretty solution, but was sturdy, relatively inexpensive and reusable. Most importantly, my mother felt better as the humidity in her apartment decreased.
Here are my tips if you find yourself in the same casement window conundrum:
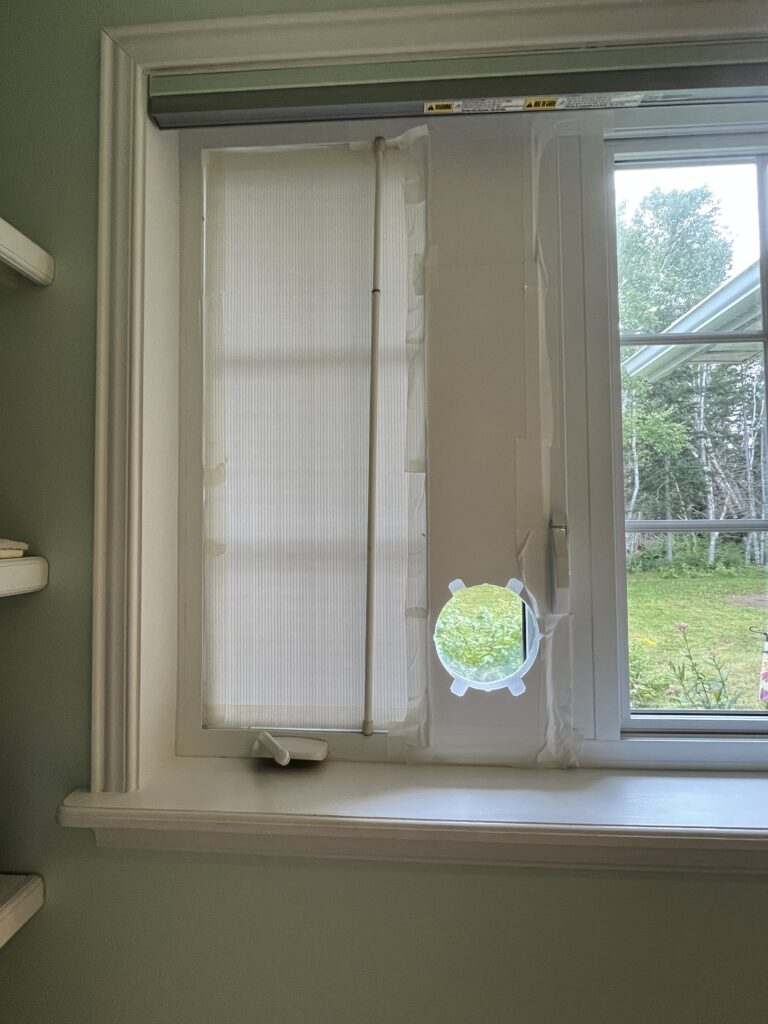
Cut the plastic sheet a couple of millimetres larger than your window opening. You can pare it down to make it fit tightly, but you can’t add onto it if it’s too small, and unless you have perfect measuring and cutting skills, the plastic is tricky to cut exactly straight, and windows aren’t always perfectly straight either.
Once I had the plastic sheet fitted snugly in the window, I removed it and used the insert as a template to draw a hole at the bottom for the duct to vent through. The plastic is easy to cut, but take your time and use the smallest knife blade you have, like a #2 exacto.
I put the plastic sheet back in the window and then placed the window insert in front, and the hose hooked to that. At first I thought I could just insert the hose to the plastic sheet, but the hose is heavy and I feared the weight of it could pull the sheet away from the window. There was no way to keep the loosely-fitting insert in place without taping it to the window frame on the right side of my setup and the plastic sheet on the left, so that’s what I did.
As added support, I used a spring-loaded curtain rod to add additional support to keep the plastic sheet in place as it bowed out a bit in the heat. If I had been able to get thicker plastic, this might not have been necessary, and I’m starting this year without putting it up.
Although the plastic sheet was tight enough to stay in place on its own, I finished the setup by running duct tape around the entire window to both keep the sheet and insert in place and keep insects out.
The duct tape I used was made by 3M and though it was sticky enough to stay on all summer, it came off quite cleanly, with only a bit of cleanup. No insects came in, which is a miracle in our mosquito-filled location. Good quality duct tape is worth the extra money.
It took me an hour or so to get this fitted for the first time last year, but this year I had everything up and running in about 10 minutes.
I am unhappy we need air conditioning at all, and am conflicted by having to use precious resources such as electricity and plastics and metals in this way. It seems a step backward, and I’m thinking what I can do to make up for this. The heat pump is supposed to be more efficient to run than the portable air conditioner, and will also provide heat in colder months that will make us less dependent on heating oil. Swings and roundabouts.
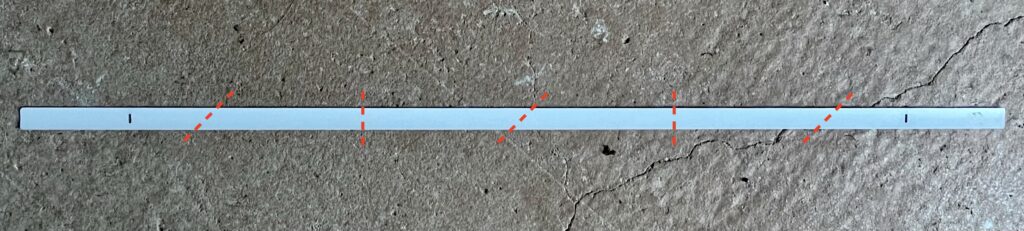
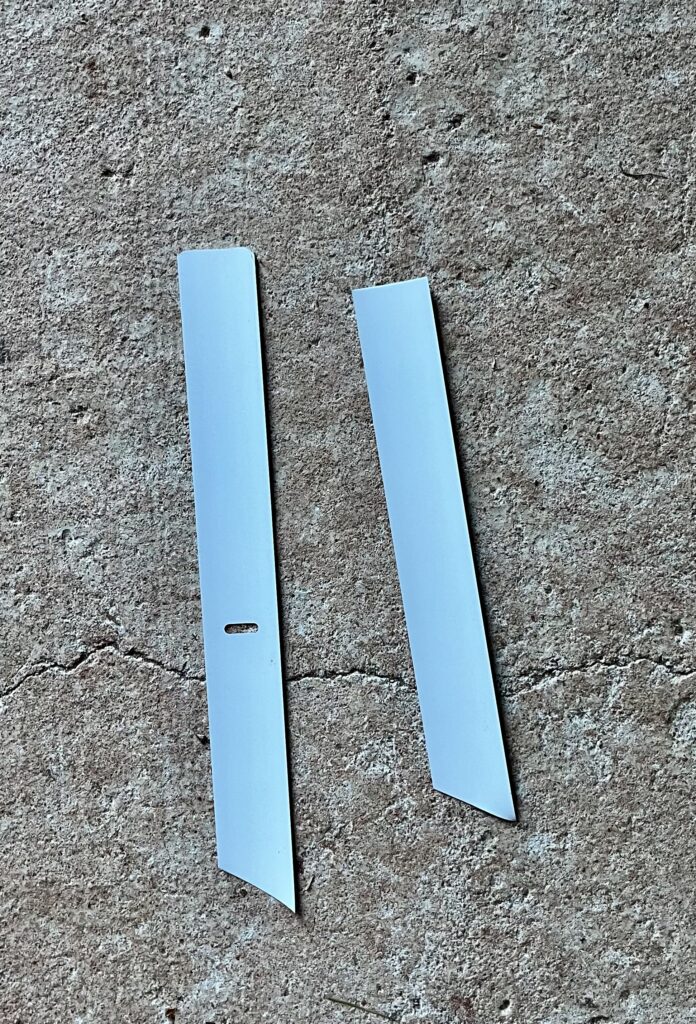
I am certainly not the first person on the internet to share the hack of using old window blind slats for garden plant markers, but here’s my preferred method for cutting them so the marker has one pointy end for sticking in soil and one square end where the plant information can be written:
I think I’ve only seen them squared off on both ends, but sometimes it’s nice to be able to shove a marker in next to something you would like to remember to move when the time is right (and that time isn’t right then) and the soil is perhaps a bit hard and unyielding.
I was lucky to get metal blinds from a friend who was replacing hers, giving me what I imagine will be a lifetime supply. I only cut a few at a time as needed as I find them easier to store in their original length; I put a shower curtain hook through the holes at one end and hang them on the wall.
Bonus content: I’ve found dozens of uses for metal shower curtain hooks in the garden. They are cheap, reusable light-duty hooks; buy a package and you will be hooked.
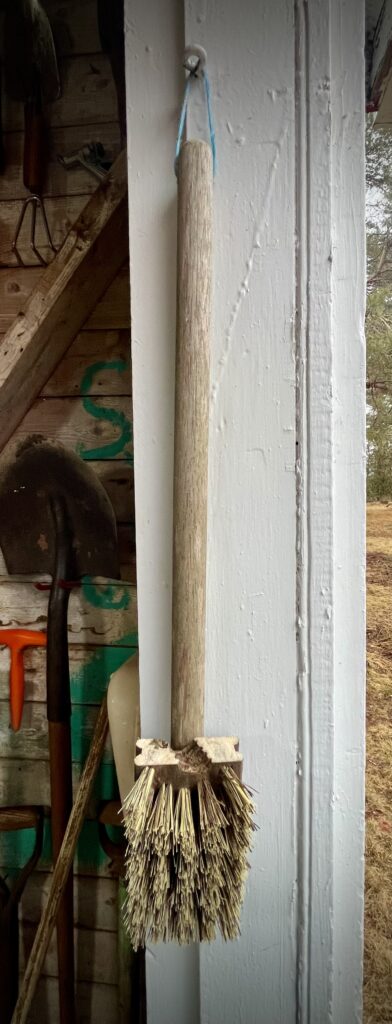
My attempts to find a reasonably-priced wooden scrub brush with a handle to use outside to clean garden buckets, tools and feed and water dishes for the hens have never been successful. There are tons of plastic ones, but the bristles start falling out after just a few uses and the plastic breaks down over time.
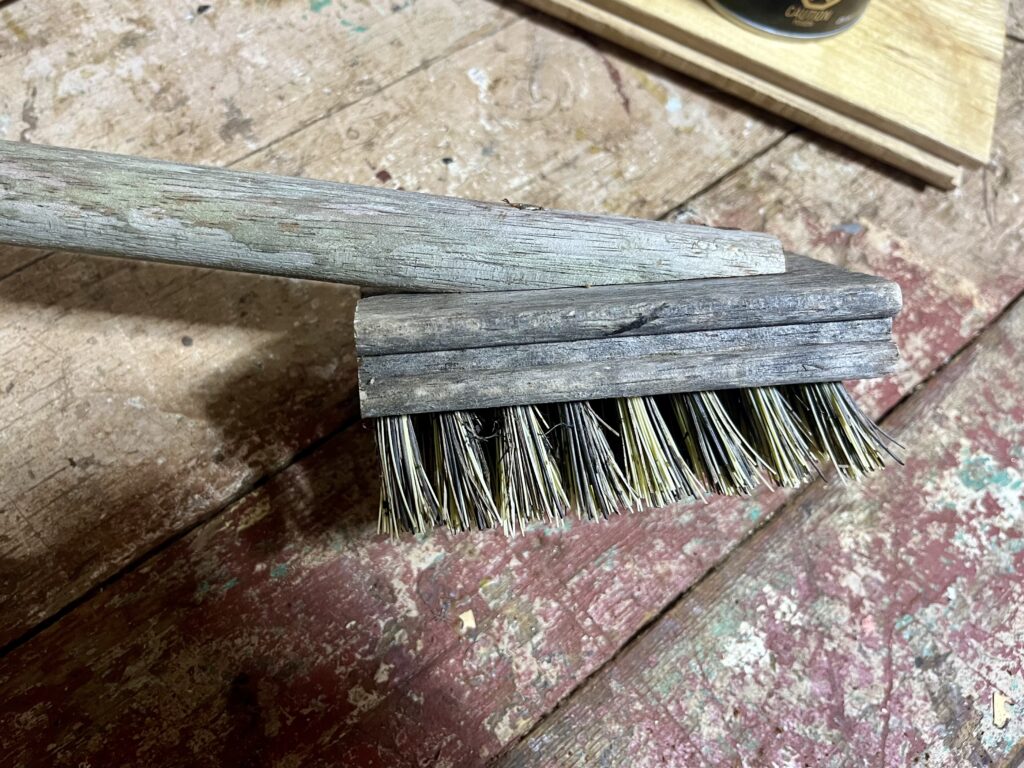
A couple of years ago I found a small wooden brush, much like the scrub brushes my mother used to use to clean floors, but this one had a hole for a handle. The bristles seem to be non-plastic, probably from hogs, probably from China. Not ideal, no doubt a by-product of industrial farming, but better than plastic, I guess?
The brush worked okay, but was a bit too big and unwieldy for smaller items and, as I’m often cleaning things in sub-zero temperatures, not having a handle meant wet, cold hands.
Yesterday I looked at the brush and thought I might be able cut it in two and add a handle to each half, thereby creating a more nimble tool and getting two brushes out of one: one for garden things and one for hen things. So that’s what I did.
Cut the end of the handle at a bit of an angle for easier scrubbing.
I pulled a wooden rake handle from my bucket of “pointy things used in the garden” (rebar, many old broom and rake handles, a couple of pieces from an old TV antenna) and cut one end so it would sit flat against the top of the brush. I screwed the handle on, cut it to the length I needed, and that was it, quick and easy. I added a hole at the end to attach some twine to hang it up and I’m all ready for more comfortable scrubbing.
The handle turned out to be made from a beautiful and extremely hard red wood. I’ve no idea what kind it is, and possibly it, too, is from China. It was a surprising pleasure to drill into it, pushing hard against the firm tight grain, and watch red curls come out in the drill bit. It is satisfying to know I am reusing this piece of wood after the rake head it once held fell apart, ensuring the tree that stretched and grew towards the light, sheltered birds, animals, insects and bacteria, brushed against its neighbour, felt the rain and watched the moon and sun dance across the sky, did not fall in vain.
From about the age of 75 up to a couple of years ago when she was 98, my mother walked on a treadmill twice a day, every day, for 15 minutes each time. After breakfast and after lunch. Not fast, not trying to break any records, just walked at a good pace. She listened to Anne Murray and John Denver cassette tapes and hummed along.
She’s 101 and in remarkable health, so I try to follow her example and keep moving. I enjoy walking, especially in our woods, but the conditions around our house the past couple of weeks have been treacherous. Ice has completely covered our driveway and we wear grippers on the bottoms of our boots to go out.
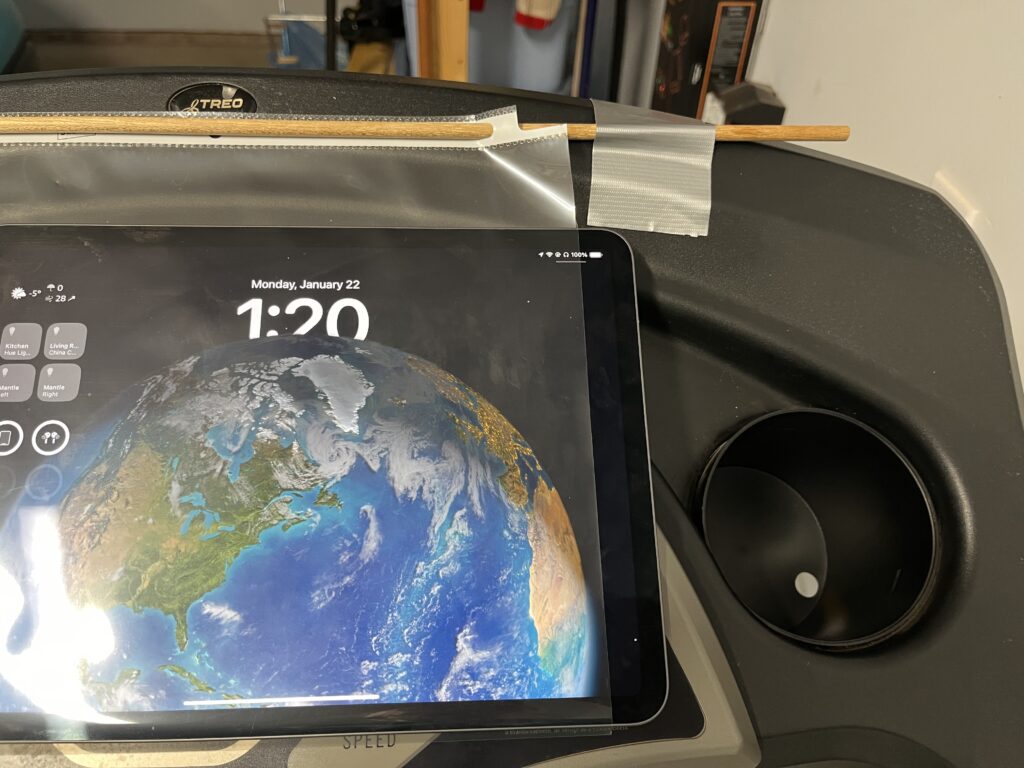
So I’ve been forced onto the treadmill in our garage. It’s an old one, but still in good shape. I know if I can watch movies or videos I will be distracted from how boring the whole enterprise is and stay longer, but there isn’t a device holder on the treadmill console. I tried putting my iPad on an old music stand, but it was a bit tippy and awkward to reach. I considered buying a holder that would attach to the machine, or trying to build something myself, but just never bothered and listened to podcasts instead.
Then today I was putting a piece of paper in a plastic sheet protector and bingo, problem solved! Five minutes later I had hung a sheet protector from a piece of dowel and attached this to the treadmill console with two pieces of duct tape. It’s not pretty, but it works (which would also be the title of my DIY book, if I ever wrote one). The iPad covers most of the display, but I kind of prefer that as I’m not constantly watching the time tick by, and the iPad can be easily lifted if need be.
Added bonus I hadn’t anticipated: the touch features of the screen are usable through the sheet, which might also come in handy if keeping an iPad clean in the kitchen.
I might replace the tape with something like conduit clamps, attaching them by drilling carefully through the plastic console, but the tape seems good enough for now.
I now hope to walk and walk and walk to 100 while watching cat and DIY videos.
Gorilla-brand duct tape is kind of expensive, but it is super sticky and super strong.Easy access to controls.Easy to slip the iPad in, but doesn’t feel like it would fall out (something I don’t wish to test!).
My third crop of garlic went in the ground this afternoon. I started with two bulbs of Phillips, a hardneck variety purchased from Hope Seeds, in 2020. That duo yielded 22 bulbs that I planted last fall, with the miraculous result that all 150 cloves planted grew! I credit the aged chicken manure produced by our little flock for the good outcome.
Phillips proud of Phillips.
I kept the 50 largest bulbs to plant this fall and the rest I have been using in the kitchen. Local garlic is wonderful but expensive, so it really is a worthwhile crop, even in my small garden. It doesn’t take a lot of work, and having something to plant in the fall when everything else is going dormant and there is less to do in the garden is very hopeful.
I plant garlic in rows 6″ apart. Luckily the dibber I use to poke the hole for each clove has a shaft that is exactly 6″ long, so it’s easy to space them out in the bed.
But equally as lucky, if I just want to poke a hole with my finger, is that I know that my hand is 6″ long, and my index finger is almost 3″ long, pretty much the perfect depth for a garlic clove. One of our set design teachers at the National Theatre School taught me that trick, to measure your hands and fingers so you would never be without a measure. It is one of the “handiest” hacks I know!
My hand is a half a foot, but a whole hand!And 3″ wide.
Hail to the 5-gallon bucket, the ubiquitous hold-all and do-all. Preppers seems to have a million uses for them, so look for them on the coat of arms of some future post-apocalyptic government. I am not a prepper, but I like to be prepared, and have many empty 5-gallon bucket, so I reserve the right to some day become a prepper. I’m ready!
I love using these buckets in the garden for weeding, but have always wished I could get the handle to stand up to make the bucket easier to grab and go. This week I cracked it. Bucket, meet bungee cord.
The handle stays up, so I won’t be grabbing the side of the bucket to move it when I’m on my hands and knees in a flower bed, which has always meant eventually breaking chips off the side of the bucket. And it’s easily reversible if I want to let the handle fold back down.
The bucket handles are mostly made of metal with a plastic piece that you hold. That plastic piece seems to break down long before the bucket does, and carrying a heavy bucket while only grabbing the thin metal bit is uncomfortable, so I take a piece of old water hose, cut off a suitable length, split it lengthways, and tape it over the handle. Ready for a few more years of puttering.
Electrical tape, because my father used electrical tape to mend everything, and I have many vintage rolls to get through.