The brilliant folks at the solar-powered website, Low-tech Magazine, have designed a solar-powered coffee maker, and the plans are freely available on their site. I love this idea, and them, so much.
Solar-powered coffee maker
Leave a Reply

The brilliant folks at the solar-powered website, Low-tech Magazine, have designed a solar-powered coffee maker, and the plans are freely available on their site. I love this idea, and them, so much.
Ruby-throated hummingbirds are back on PEI, and the first one arrived in our yard on May 8. They are beloved summer residents, adding zip and zing to our summers and then heading south again the first or second week of September.
I have two feeders for them (three, really, as I have an extra one to replace one that is being cleaned). The sugar water they drink also attracts ants, who motor up and down the ropes the feeders hang from, many of the little souls drowning in the feeder wells. Hanging hummingbird feeder moats that hold water can be purchased to block ants from reaching the feeder.
Or you can make your own for free from some wire and an old spray can lid or something similar. There are a million tutorials online. Poke a hole in the lid, bend a wire hanger into a hook and push it through the hole, and seal and glue the hanger in place. I made some over 10 years ago and they are still saving ants from a sugar-high death.


It’s probably no surprise to anyone who reads this blog that I like to keep the things I own for as long as I can, which has meant figuring out how to fix a lot of things. It started out as frugality but has now become as much, if not more, about keeping things out of landfill. I get this trait mostly from my father, who worked hard for everything he got. Even later in his life when he had money to buy new things, he would buy used and fix them up, always looking to save a dollar. I am a bit more of a spendthrift in comparison, not having his mechanical skills to buy things like used lawnmowers and get them going, but I certainly have the desire to not spend money on replacing something that could be fixed.
The handle of my 2001 vintage snow shovel, purchased at Callbeck’s Home Hardware in Summerside, broke this morning while I was trying to dislodge frozen snow and ice from my mother’s deck. I knew not to use it to pry, but the temptation to get one more piece of ice shifted was too much, and I paid!
I trundled off to my shop, stood in the warm springish sun and whittled the end of the shovel handle so it would fit back into the blade. It’s a bit shorter now than it was when purchased, but I bet I am a few centimetres shorter as well, so it evens out. The cutting edge on the shovel blade has worn down over the years, and I’ve periodically trimmed the sides to even it all up.

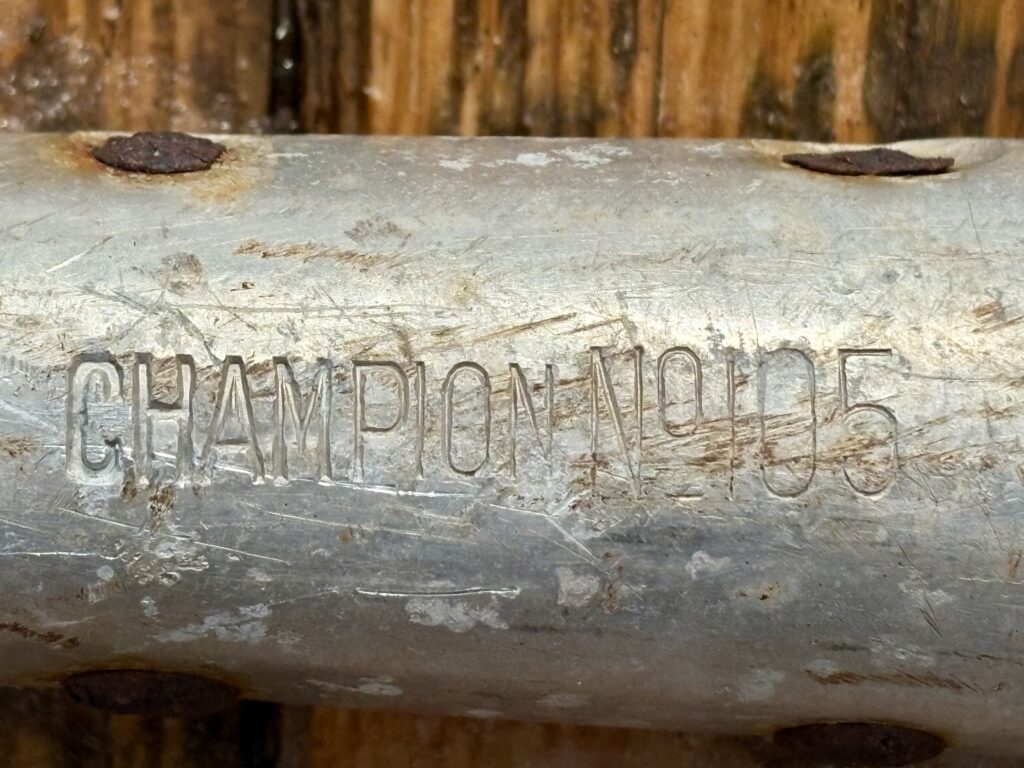
I put the repaired shovel next to a metal one with a wooden handle that stands beside our shop door and is used to clear that step and the chicken run. It is really old – older than me, I expect – and would have come from our general store. It used to stand outside the back door of our former house next to the store. It’s a Champion No. 105 and though it has been outside for most of its life and has a crack in the blade where someone else pushed the limits of what you should pry with a snow shovel, it is still good. I have an extra handle kicking around from another shovel that rotted away that I can always replace the Champion’s with, if need be.
So, I’m in good shovel shape for another 23 years, when I will be 81 and hopefully still shovelling and fixing and standing in the sun.
I have a blue winter jacket I bought at Eddie Bauer in Toronto about 30 years ago. I wore it every winter day for years. The colour has faded and it’s a bit too big for me now, but the jacket is generally in great shape, no rips or tears. It’s been my chore and barn coat for a long time.
The zipper stopped zipping a couple of years ago, splitting when I pulled the slider up, the plastic teeth meeting but not grabbing. The jacket also has snaps, so I just used those instead, but it wasn’t ideal.
This morning I wondered if there was a way to fix the zipper. Of course there is! The slider just needed to be tightened a bit, as per this video. Five seconds with a pair of pliers and my coat zipped up as in days of yore and I was off to shovel snow. Magic.
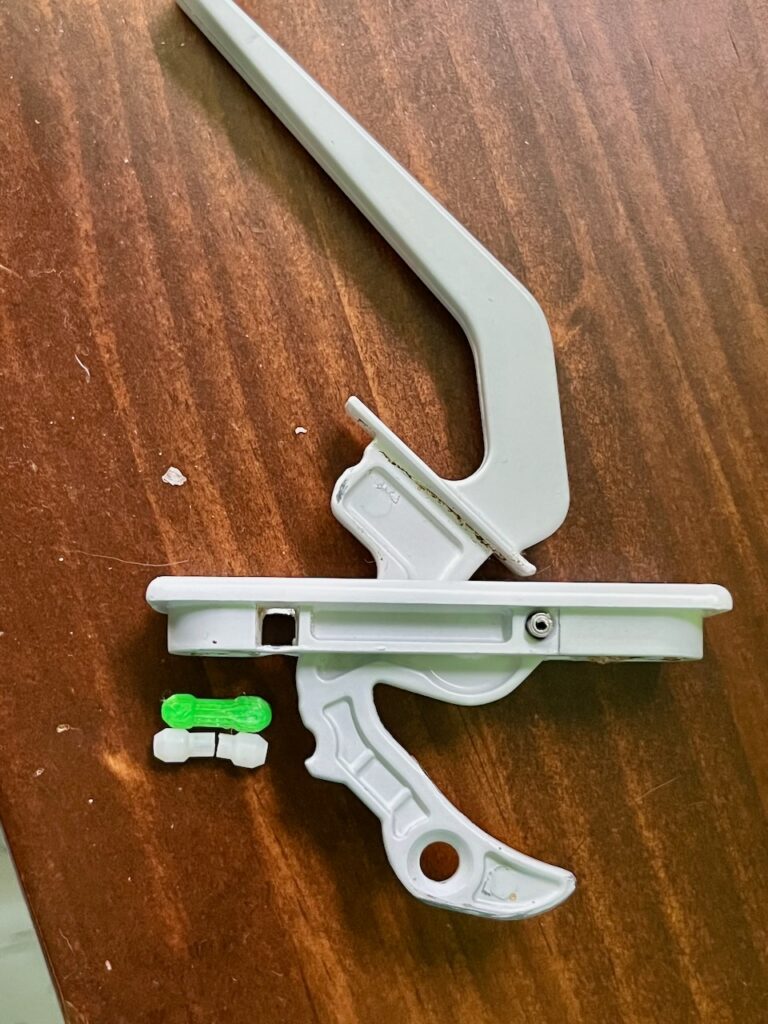
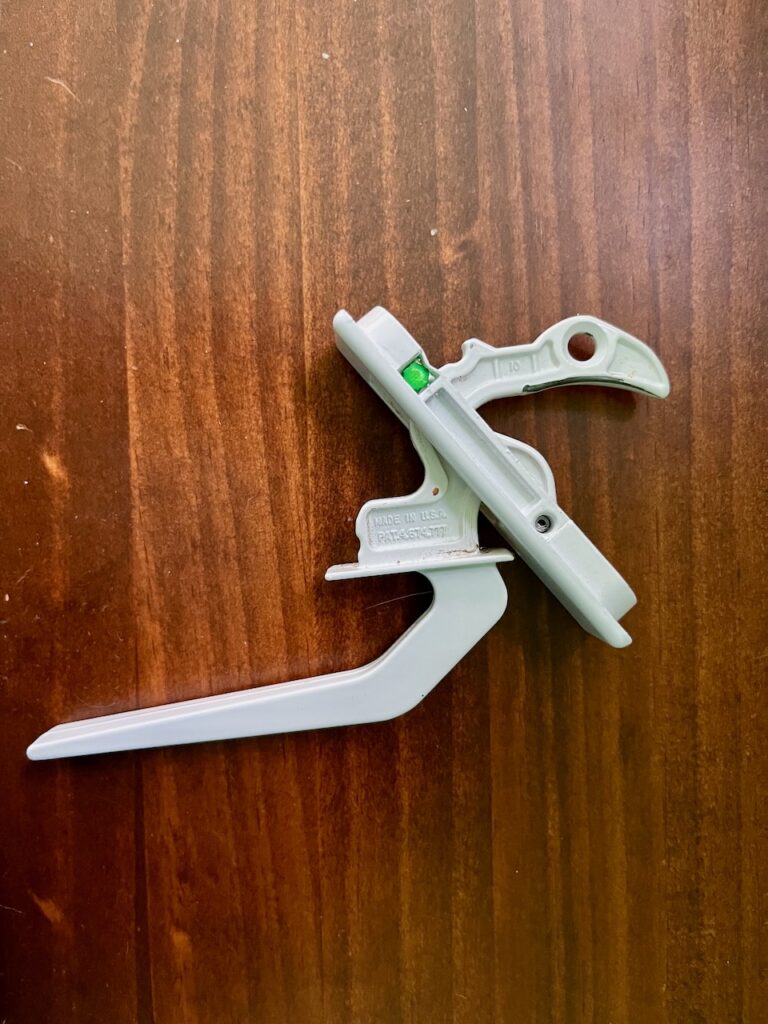
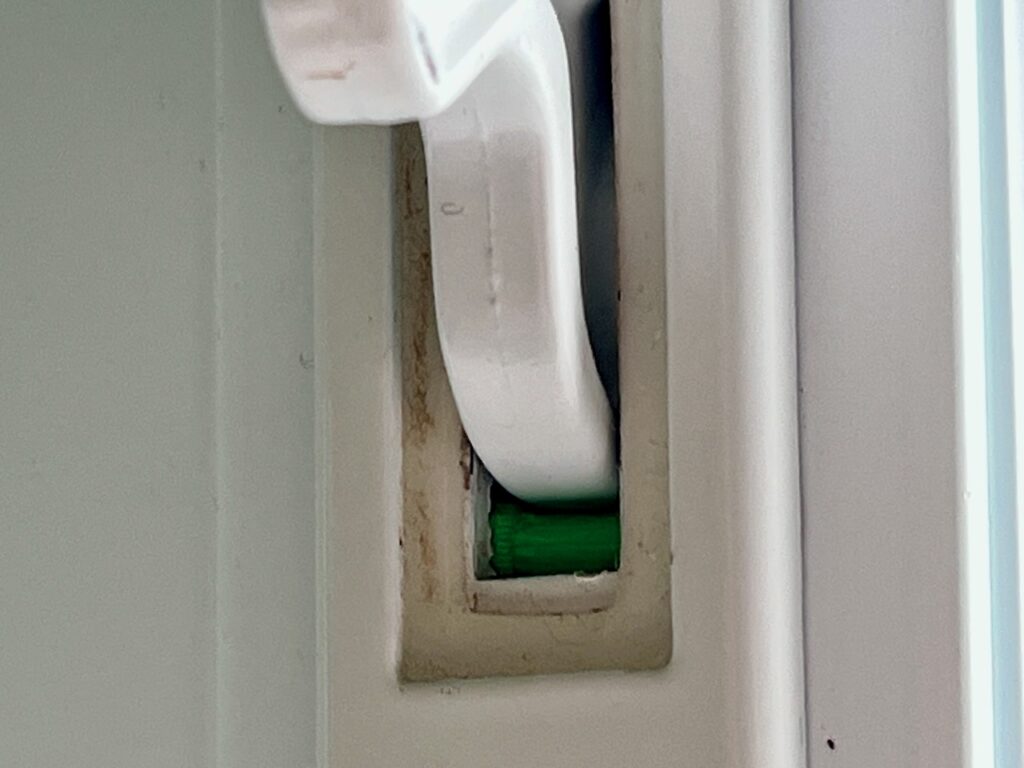
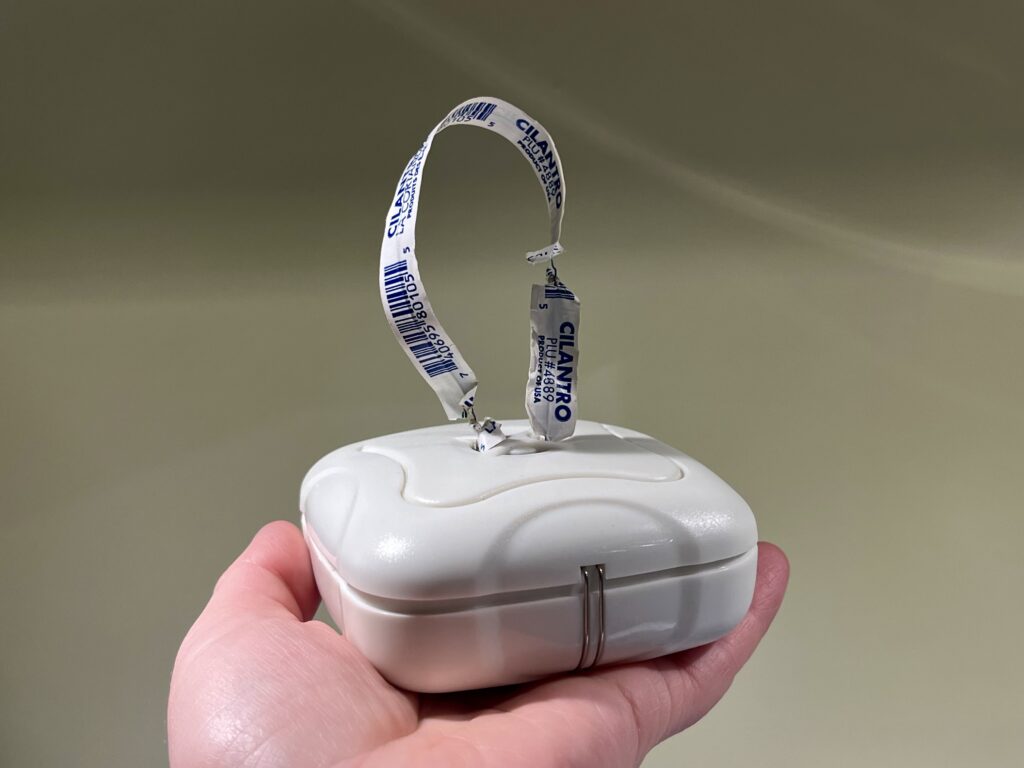
One of the locks on a 22-year-old Jeld-Wen casement window in our bedroom stopped working properly this summer. The window has a lock on either side that pulls the window sash tight against the frame when closed. The lock handle had always clicked into an open position ready to accept the tab on the sash to pull the window tight, but suddenly the handle wouldn’t stay in the open position. It was more an inconvenience than a huge problem, but seemed it should be fixable.
I unscrewed the handle to remove it from the frame to have a better look at it. Comparing it to the lock that still worked, I found a little plastic piece that had been holding the lock in the open position was now broken in two pieces, so the handle had nothing to grip to stay open.
I found an Instructable explaining the problem and a file to 3D print the tiny little plastic piece. Unable to justify buying a 3D printer just to print a Tic Tac sized piece, (though I tried!), I put the file on a thumb drive, filled in a request form and dropped both off to the Summerside Rotary Library with a $2 deposit. I received a phone call a week later to say the piece had been printed. The file actually prints two of the plastic pins, probably because each window has two locks. When I made the request I only needed one, but another pin broke on another window in that week, so I had all I needed for two repairs all for a toonie!
I’m not sure I’ve seen anything that had been 3D printed up close before this. The original piece was most likely injection moulded, so was smooth, but the 3D printed piece had ridges and wasn’t completely round. I couldn’t get the piece into the little slot in the lock at first, but carefully scraping a bit of a ridge off one side allowed it to slide in. Both locks now work perfectly.
Thanks to Gubutek for this nifty fix and my first satisfying dip into the future of fixing.

I woke up the other night to a faint buzzing downstairs, looked around for the source and finally clued in it was coming from the laundry room. The little plastic water leak detector behind the washing machine was beeping away, but thankfully there was no water, so I decided it must be a low battery level warning.
The only way to stop the noise was to remove the 9 volt battery, so found a screwdriver to pry open the detector. Still half asleep, I pulled too roughly on the battery connector and left the negative terminal stuck inside the battery. A drag, but the noise stopped, so, partly victorious, I climbed back into bed.
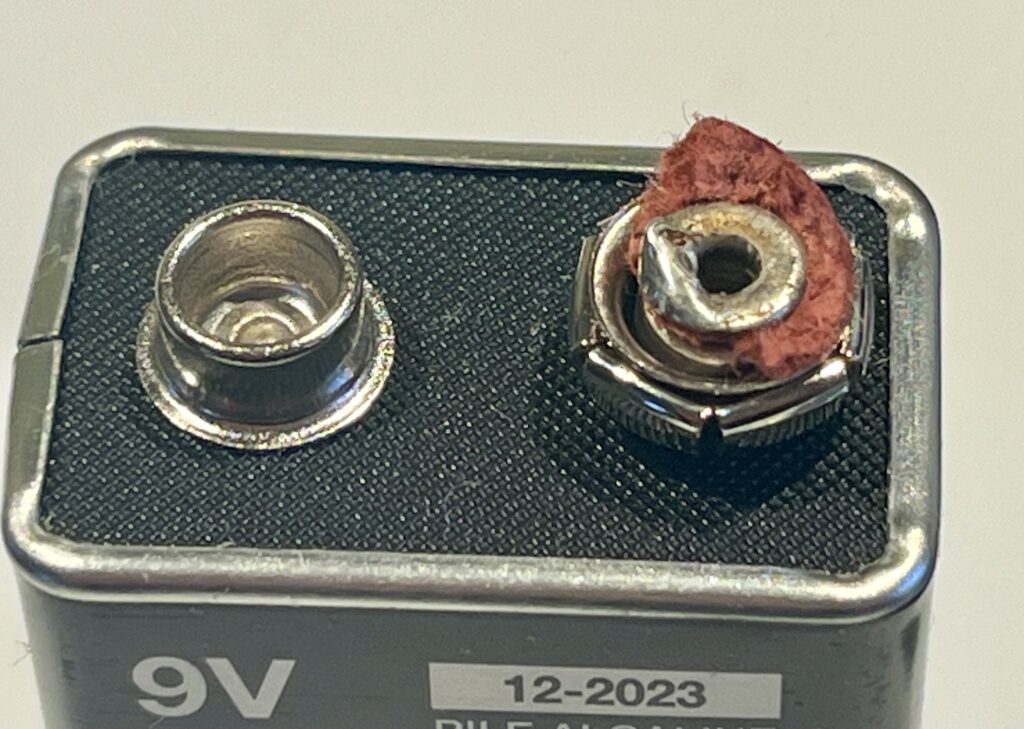

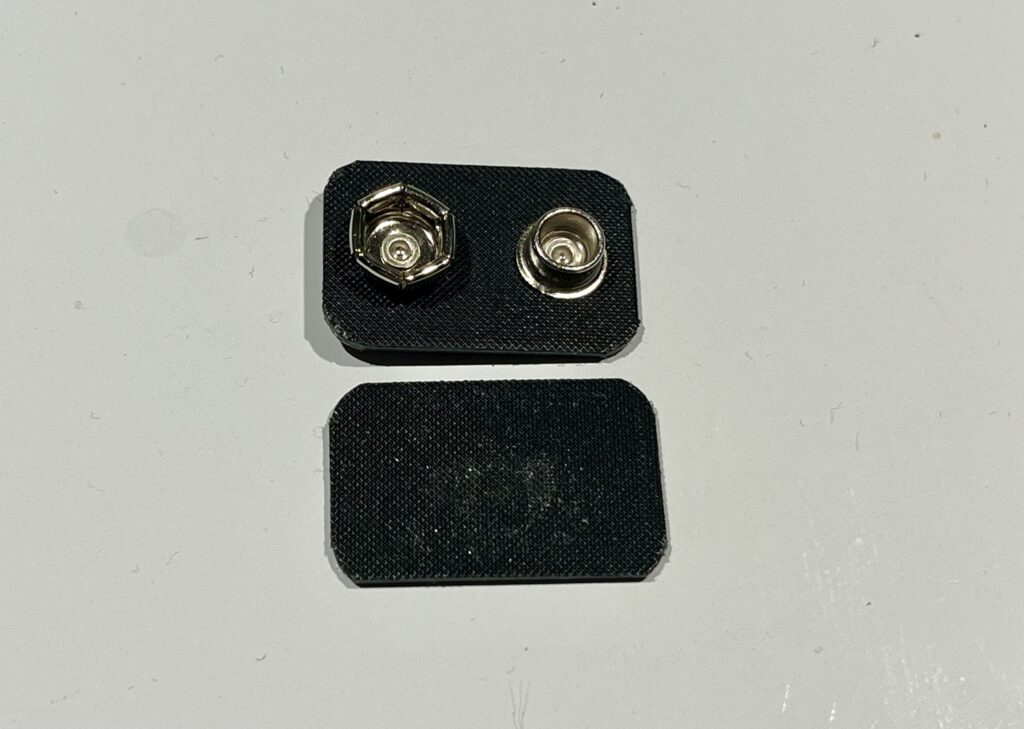
The next day I looked up how much it was going to cost to replace the wounded little detector ($23+tax!) and wondered if I could instead buy a cheap 9V battery connector and try to fix it. Lots of them out there, but only in quantities of 5 or 10, and I couldn’t see me needing that many in this lifetime.
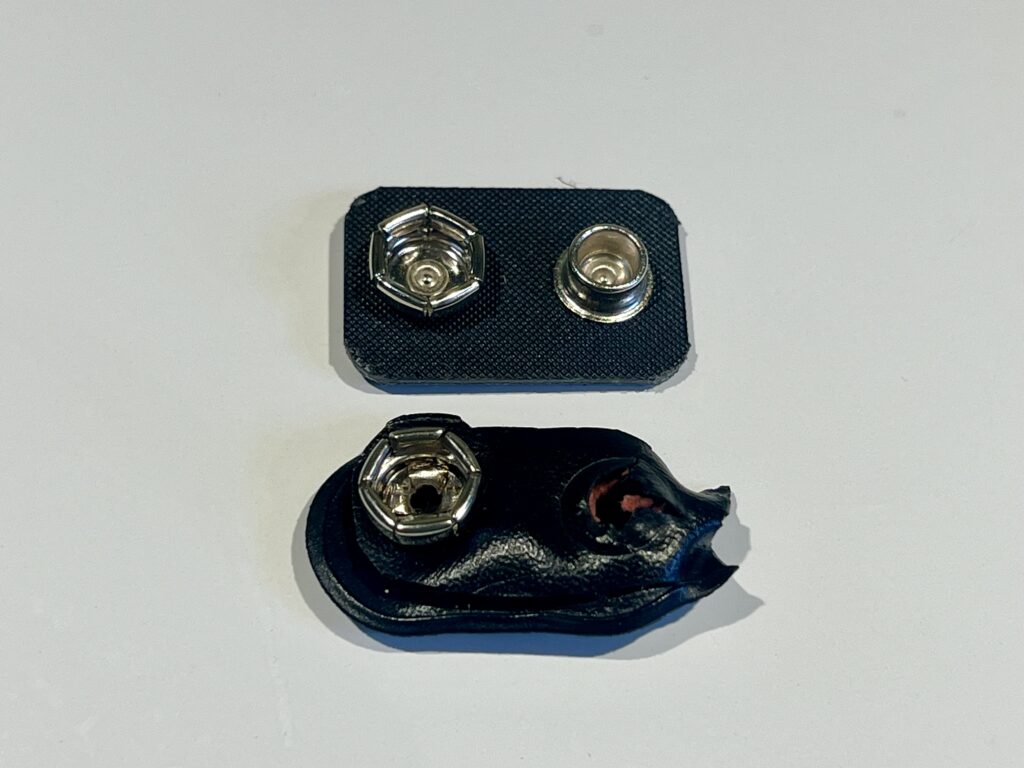
Didn’t take much internet sleuthing to discover what most of the world already knows: take the top of a dead 9V battery and use that. Hiding in plain sight.

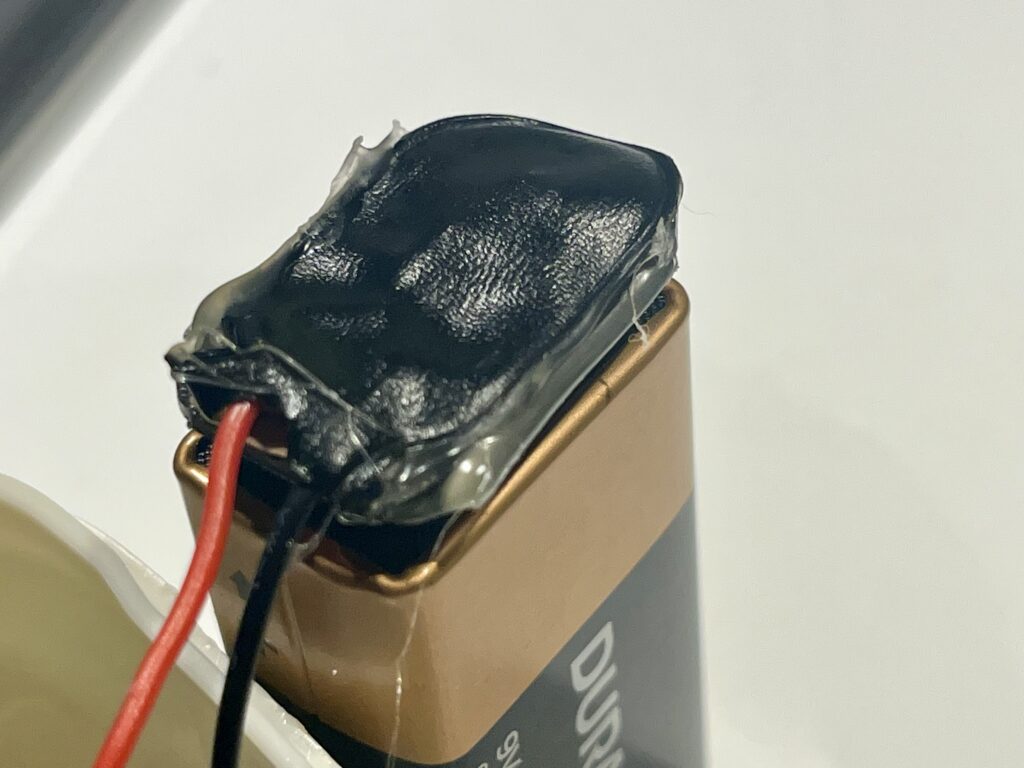
I’ve taken many things apart in my tinkering and puttering career – oh, the fizz of danger when slicing a golf ball in half and the rubber threads viciously unwound, or pulling the back off our ancient Panasonic television to see the tubes inside when I was a kid! – but it never dawned on me to carefully cut open a battery. That seemed a step too far, unnecessarily dangerous, the possibility of an explosion and/or toxic yuck oozing out and poisoning me. And possibly that can happen, so be careful.
A couple of Instructables later and I had a fresh battery attached to the new connector on the little detector and put it back on duty. I’m a terrible solderer and it still worked, proving yet again that good enough is good enough. A very satisfying fix.
Like many on PEI have already done, we are having a heat pump installed next week. My mother has a 900 square foot apartment at the end of our house, and we want the unit for the air conditioning feature in the summer. It’s something we’ve resisted, mostly because we’ve never needed air conditioning here in the past and it seemed like an environmentally-unfriendly extravagance, but the heat and humidity we experience regularly in the summer now takes its toll on her at age 101 and it’s time to give in.
I was hoping the installation would have been done earlier in the year, but backordered units and a busy installer (I have learned to beware the tradesperson who is quickly available!) delayed things, so I hauled out a portable air conditioning unit today to give my mother some comfort in this latest heat wave.
I bought the a/c unit a year ago when my mother started to feel unwell during another heat wave (there are so many now). In my haste to help her to feel better, I didn’t do much research before buying and then realised when I got the unit home that the crank-out casement windows we have were a problem as the insert to hook the exhaust hose to the window were made for hung or sliding windows only. There are lots of janky looking contraptions available online to solve this problem, but I needed some way to hook it up quickly.
My first attempt, a panicked corrugated-cardboard/dollar-store-duct-tape affair, collapsed in the middle of the night and allowed swarms of insects into her bathroom, so I searched for a better solution. I found a few hacks using a piece of plexiglass to fit the window opening and cutting a hole for the hose, but I know from experience that plexiglass can be tricky to cut, especially a circle, and it’s expensive to experiment on, so that was out.
Then I thought of corrugated plastic sheets, the same stuff that is used for signs and packaging. The closest place that had any in stock was Home Depot in Charlottetown, so I ordered for pickup two of the thickest pieces they had (two in case I screwed up the first one!) and some good quality duct tape. I bundled my mother into the car for the 200 km roundtrip to give her both an outing and the benefit of the a/c in the car, a nice salesperson brought the goods out to us, and we boomeranged home so I could hack away.
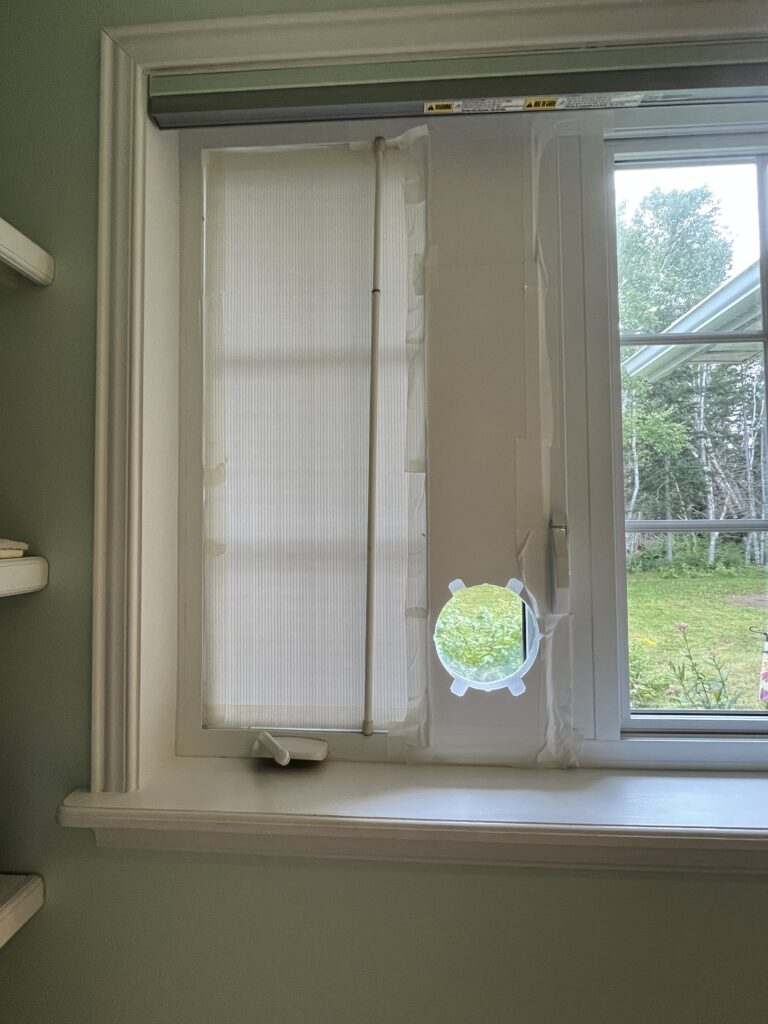
I was surprised by how well my setup worked last summer. It isn’t a pretty solution, but was sturdy, relatively inexpensive and reusable. Most importantly, my mother felt better as the humidity in her apartment decreased.
Here are my tips if you find yourself in the same casement window conundrum:
I am unhappy we need air conditioning at all, and am conflicted by having to use precious resources such as electricity and plastics and metals in this way. It seems a step backward, and I’m thinking what I can do to make up for this. The heat pump is supposed to be more efficient to run than the portable air conditioner, and will also provide heat in colder months that will make us less dependent on heating oil. Swings and roundabouts.
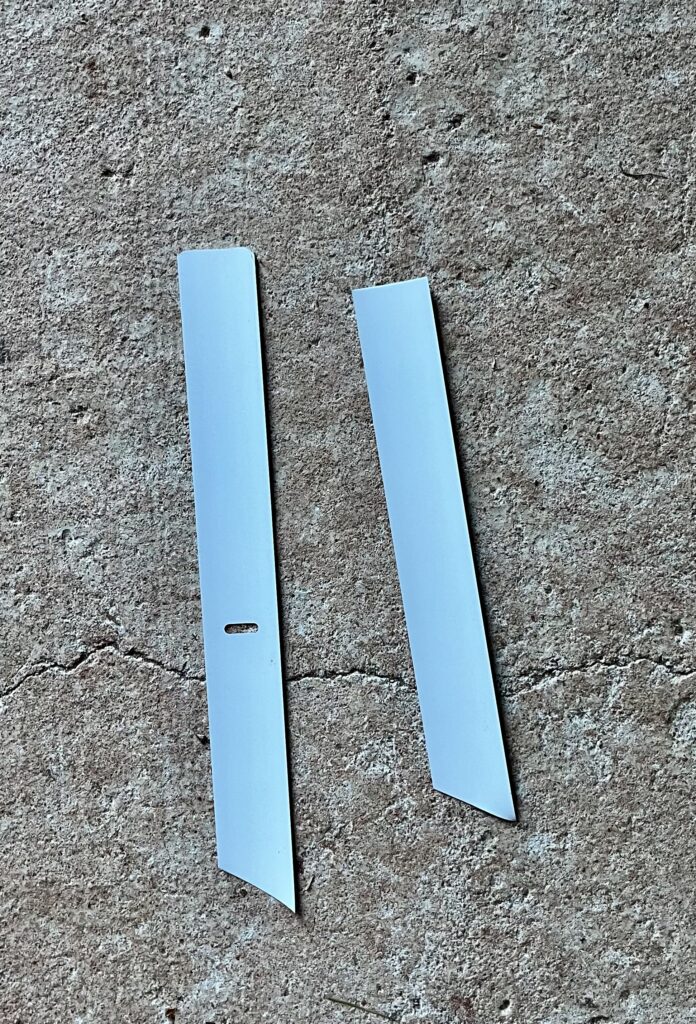
I am certainly not the first person on the internet to share the hack of using old window blind slats for garden plant markers, but here’s my preferred method for cutting them so the marker has one pointy end for sticking in soil and one square end where the plant information can be written:

I think I’ve only seen them squared off on both ends, but sometimes it’s nice to be able to shove a marker in next to something you would like to remember to move when the time is right (and that time isn’t right then) and the soil is perhaps a bit hard and unyielding.
I was lucky to get metal blinds from a friend who was replacing hers, giving me what I imagine will be a lifetime supply. I only cut a few at a time as needed as I find them easier to store in their original length; I put a shower curtain hook through the holes at one end and hang them on the wall.
Bonus content: I’ve found dozens of uses for metal shower curtain hooks in the garden. They are cheap, reusable light-duty hooks; buy a package and you will be hooked.
My attempts to find a reasonably-priced wooden scrub brush with a handle to use outside to clean garden buckets, tools and feed and water dishes for the hens have never been successful. There are tons of plastic ones, but the bristles start falling out after just a few uses and the plastic breaks down over time.
A couple of years ago I found a small wooden brush, much like the scrub brushes my mother used to use to clean floors, but this one had a hole for a handle. The bristles seem to be non-plastic, probably from hogs, probably from China. Not ideal, no doubt a by-product of industrial farming, but better than plastic, I guess?
The brush worked okay, but was a bit too big and unwieldy for smaller items and, as I’m often cleaning things in sub-zero temperatures, not having a handle meant wet, cold hands.
Yesterday I looked at the brush and thought I might be able cut it in two and add a handle to each half, thereby creating a more nimble tool and getting two brushes out of one: one for garden things and one for hen things. So that’s what I did.


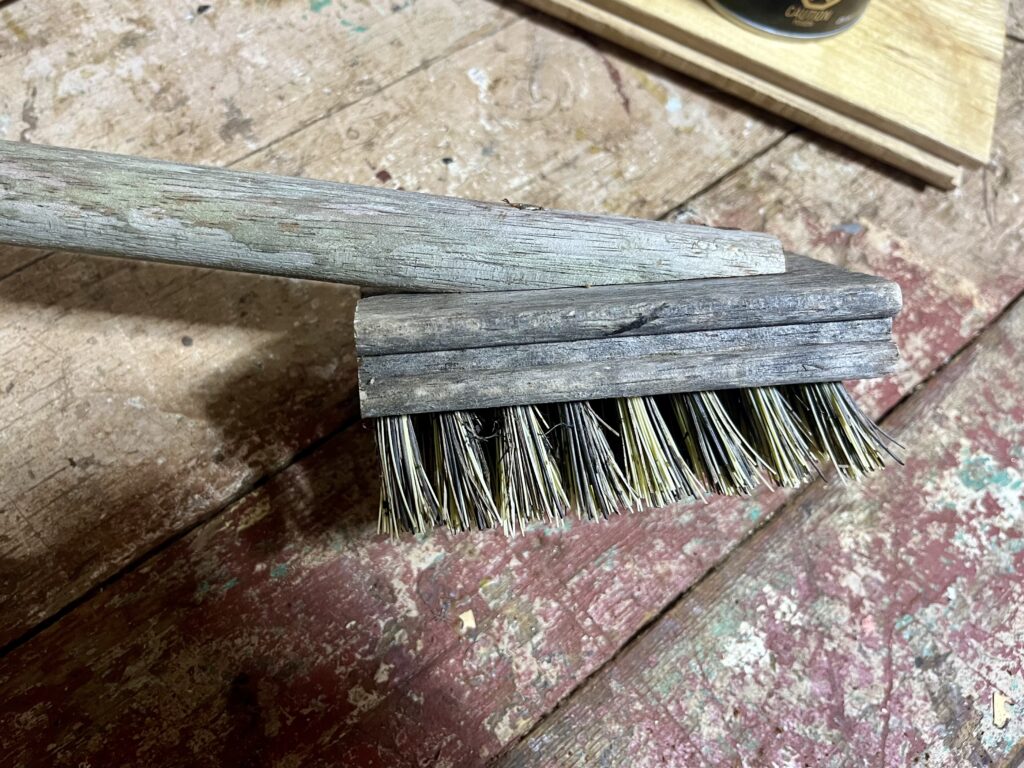
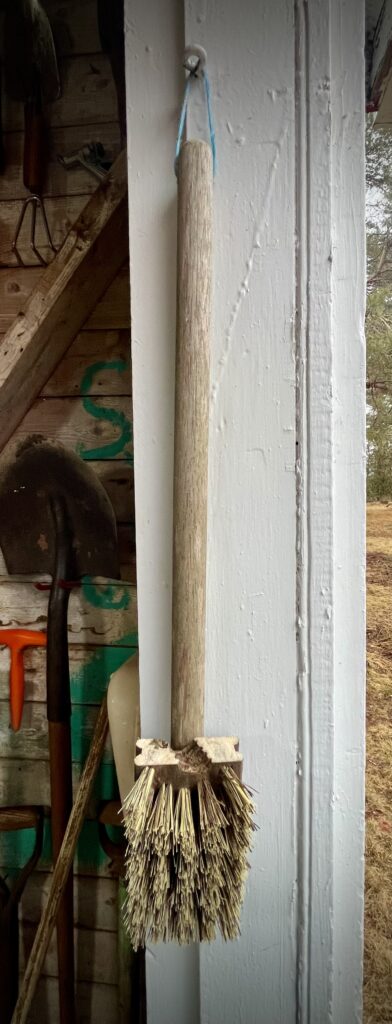
I pulled a wooden rake handle from my bucket of “pointy things used in the garden” (rebar, many old broom and rake handles, a couple of pieces from an old TV antenna) and cut one end so it would sit flat against the top of the brush. I screwed the handle on, cut it to the length I needed, and that was it, quick and easy. I added a hole at the end to attach some twine to hang it up and I’m all ready for more comfortable scrubbing.
The handle turned out to be made from a beautiful and extremely hard red wood. I’ve no idea what kind it is, and possibly it, too, is from China. It was a surprising pleasure to drill into it, pushing hard against the firm tight grain, and watch red curls come out in the drill bit. It is satisfying to know I am reusing this piece of wood after the rake head it once held fell apart, ensuring the tree that stretched and grew towards the light, sheltered birds, animals, insects and bacteria, brushed against its neighbour, felt the rain and watched the moon and sun dance across the sky, did not fall in vain.
From about the age of 75 up to a couple of years ago when she was 98, my mother walked on a treadmill twice a day, every day, for 15 minutes each time. After breakfast and after lunch. Not fast, not trying to break any records, just walked at a good pace. She listened to Anne Murray and John Denver cassette tapes and hummed along.
She’s 101 and in remarkable health, so I try to follow her example and keep moving. I enjoy walking, especially in our woods, but the conditions around our house the past couple of weeks have been treacherous. Ice has completely covered our driveway and we wear grippers on the bottoms of our boots to go out.
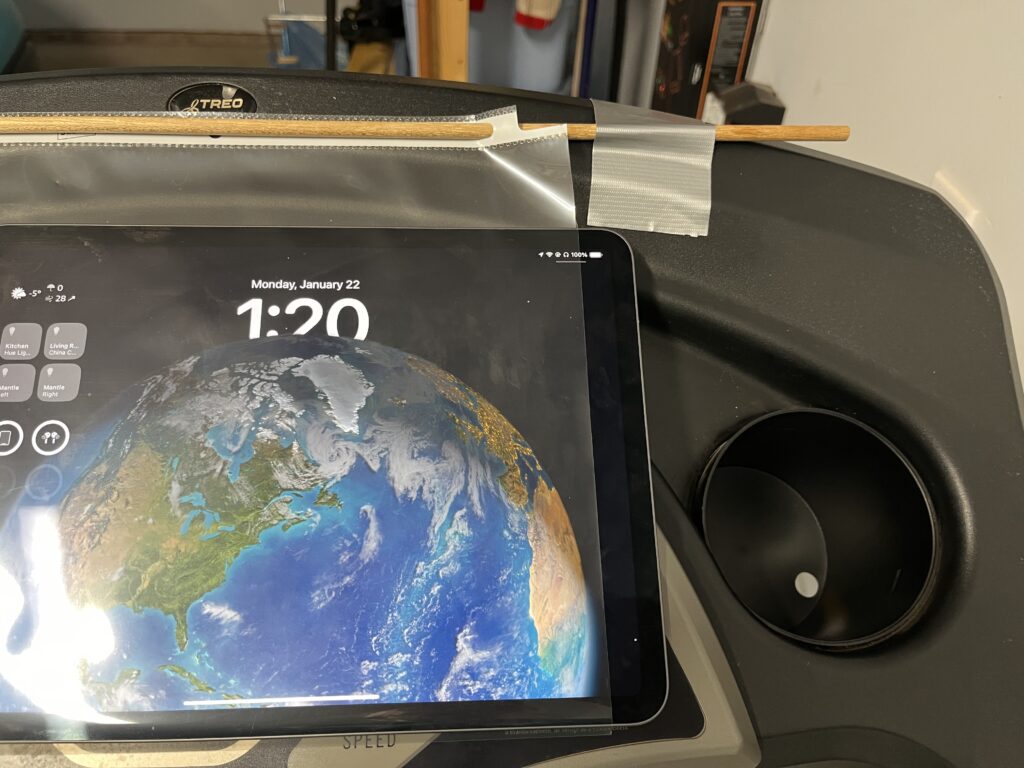
So I’ve been forced onto the treadmill in our garage. It’s an old one, but still in good shape. I know if I can watch movies or videos I will be distracted from how boring the whole enterprise is and stay longer, but there isn’t a device holder on the treadmill console. I tried putting my iPad on an old music stand, but it was a bit tippy and awkward to reach. I considered buying a holder that would attach to the machine, or trying to build something myself, but just never bothered and listened to podcasts instead.
Then today I was putting a piece of paper in a plastic sheet protector and bingo, problem solved! Five minutes later I had hung a sheet protector from a piece of dowel and attached this to the treadmill console with two pieces of duct tape. It’s not pretty, but it works (which would also be the title of my DIY book, if I ever wrote one). The iPad covers most of the display, but I kind of prefer that as I’m not constantly watching the time tick by, and the iPad can be easily lifted if need be.

Added bonus I hadn’t anticipated: the touch features of the screen are usable through the sheet, which might also come in handy if keeping an iPad clean in the kitchen.
I might replace the tape with something like conduit clamps, attaching them by drilling carefully through the plastic console, but the tape seems good enough for now.
I now hope to walk and walk and walk to 100 while watching cat and DIY videos.